How to Use Wix in 2024: An Easy Step by Step Guide
Our independent research projects and impartial reviews are funded in part by affiliate commissions, at no extra cost to our readers. Learn more
There are two ways to build a Wix website: using Wix Editor, or using Wix ADI (Artificial Design Intelligence).
In this article, we’ll show you how to build your website using each of these methods. Both are super easy and after reading our step-by-step guide, you could have a fully-finished website in just one to two hours!
Tools You May Need
Here’s a list of tools you’ll need to build your Wix website. Some are essential, but you may find others useful too.- Wix – the platform you’ll use to build your website
- Brand content – you’ll use this to fill in those all-important text boxes on your new website
- Brand photos – don’t worry if you don’t have these, because Wix provides a library of free images
Is There More Than One Way to Make a Website on Wix?
Before we get started, it’s important you know that designing a website with Wix can be done in two ways.
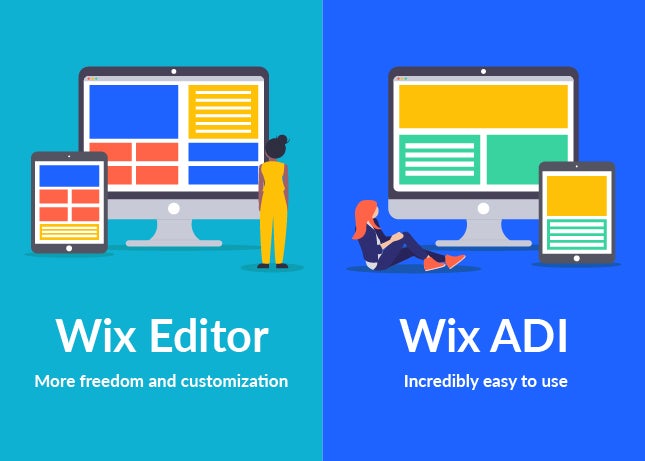
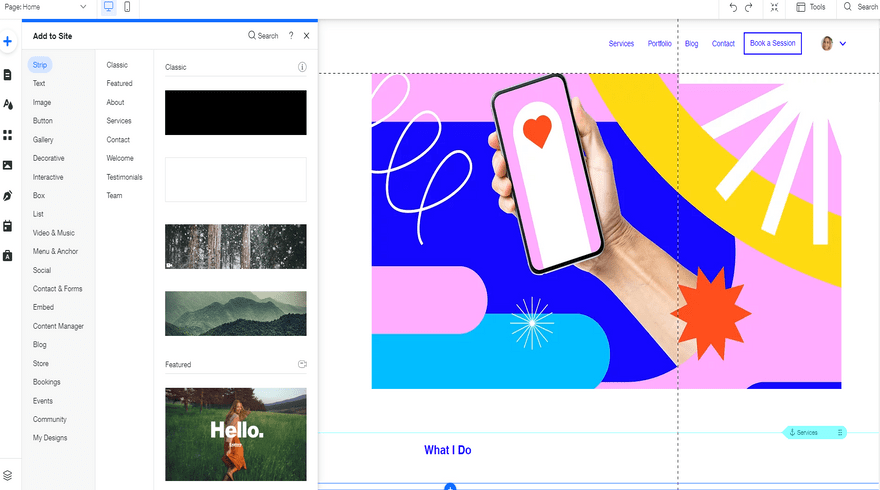
Wix Editor is the standard website builder we know and love. To start, you choose from over 800 templates. Once you’ve picked your ideal canvas, you can drag-and-drop different text and image elements to customize it. The best feature of Wix Editor is its extensive menu of options to play with.
So who is Wix Editor for? Wix Editor allows you to create a beautiful website in just a couple of hours or so. This makes it ideal for:
- Small businesses
- Restaurants
- Online stores
- Bloggers
- Photographers
The second Wix option is slightly different: Wix ADI (Artificial Design Intelligence). Using advanced technology, it creates stunning websites automatically. This is the best way to build a Wix website with minimal work on your part.
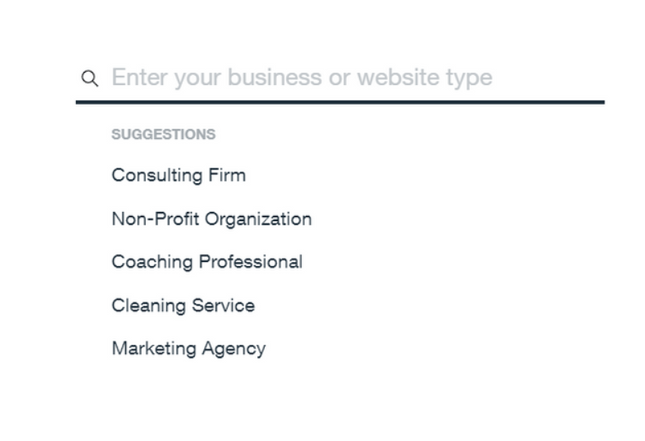
So how does Wix ADI work? Just provide some basic information, such as your business type, contact information, and online presence, and this tool will do the rest. Don’t worry though – you can even make small design changes to suit your taste once the site is generated.
So given its ease of use and impressive design speeds, Wix ADI is best for:
- Less tech-savvy users
- Busy business owners
- Time-constrained bloggers
With Wix ADI, you’ll have a bespoke website in just a few minutes. Amazing, isn’t it? But with such simplicity comes less flexibility. You can’t seamlessly drag and drop elements such as images, videos and apps like you can in the Wix Editor; you’re more restricted.
Still, regardless of which tool you choose, you’ll find it quick and simple to build a beautiful website. Ease of use is one of Wix’s top-performing areas – it achieved a high score of 4.4 out of 5 in this category, meaning it’s the easiest builder to use out of those we researched and tested!
Can’t decide which one is for you? Well, we’ve produced a Wix how-to for each tool that shows you how to create a site for sore eyes (sorry, couldn’t resist).
Further Information
- Want to know more? Read our comparison of Wix and Wix ADI here.
- Our Wix Review covers everything you need to know about this builder.

How to Use Wix Editor
Registering with Wix
If you’ve compared the top website builders out there and come to the conclusion that Wix is for you, then a lot of your work is already done. All you need to do now is head to Wix, click on any of the large blue ‘Get Started’ buttons, and create your account.
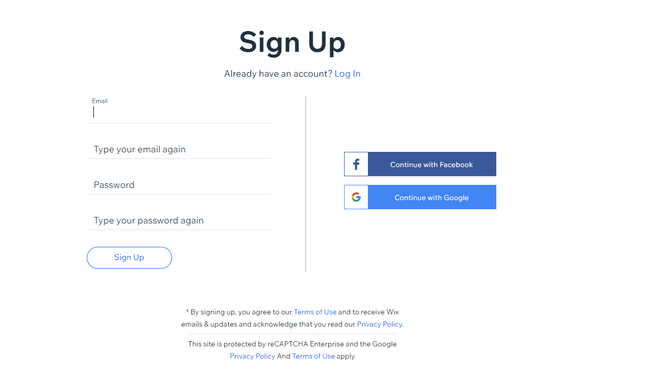
Wix will ask for your email before prompting you to create a password. After deciding whether you want to use Wix ADI or Wix Editor, you’ll then be able to specify the type of website you want to build (there’s an option for everyone, from personal blog to online store!), choose your website name and select a template.
Picking a Pricing Plan
It’s as simple as that! However, there’s still one more decision to make before Wix does the rest of the heavy lifting: you need to pick a pricing plan.
Wix offers five pricing plans, so there are a few different places you can start. As with all subscriptions, the more you pay, the more features you get. You can also choose a free plan, but you’ll have to sacrifice a professional domain name and deal with on-site ads, which give websites a more amateur look.
We recommend the Premium plans because they open up more business opportunities, however, they are a bit pricier than some plans offered by Wix’s competitors.
This is why we awarded Wix a score of 3 out of 5 for value for money. It’s not that it’s bad value, but Wix’s prices have crept up in recent years and become less competitive. However, Wix’s vast offering of features has also greatly expanded, so in our opinion, you do get what you pay for!
The Wix Premium plans are:
- Light plan: $16/month
- Core plan: $27/month
- Business plan: $32/month
- Business Elite plan: $159/month
- Enterprise plan: Custom pricing (for large businesses)
We recommend the Light plan for small businesses. It’s free from ads, comes with a personalized domain name for one year, and provides enough storage for most website needs. It’s also very reasonably priced.
If you’re starting an online store, the Core plan option allows for up to 50,000 products. For larger online stores, though, the Business plan includes an automatic sales tax calculator and advanced shipping.

Further Information
Read our breakdown of Wix’s price plans here.
Choosing a Template
Finding a Template
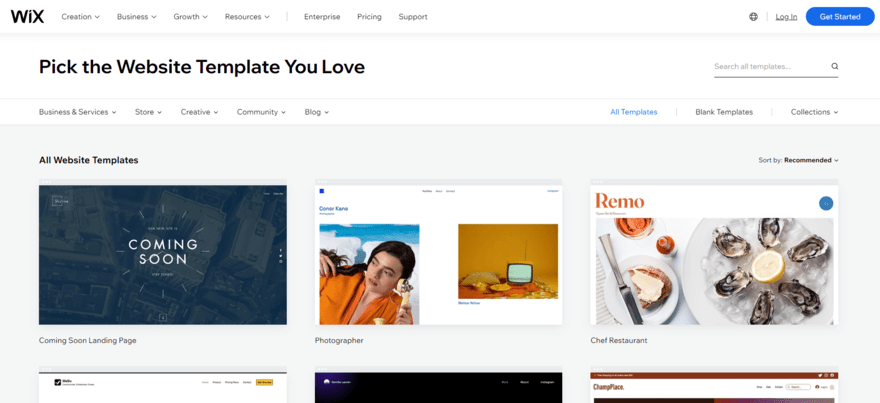
We awarded Wix a score of 4.6 out of 5 for its design functionalities, due in large part to the 800+ templates there are to choose from. Really, you’re spoilt for choice!
Wix’s vast library of templates is split out by industry, making it easy to narrow your search down even further. And if your dream template isn’t in your selected category, you can always use the search bar to find more.
Previewing a Template
Each template can be previewed before you commit to it and start editing. This is particularly useful because you’ll be able to explore all of its separate elements before making it your own. In short, you’ll be seeing it like your visitors will see it!
Making use of the preview function is especially important when you consider one of Wix’s biggest drawbacks: once you’ve chosen a template and published your site, you can’t change it at a later date.
You’ll therefore want to make sure you’re happy with the template you choose, else you’ll need to start from scratch further down the line. Don’t worry, though – Wix’s flexible editing features make it easy to spice up whatever design you do choose at any time.
Selecting a Template
Once you’re happy with the template you’ve chosen, just click the ‘edit’ button in the top right corner.
Further Information
- If you want to find out more about Wix’s designs, check out our Wix templates review.
- Looking for more inspiration? Check out our shortlist of the Best Wix Website Examples
Update Text and Images
Updating Text
Once you’ve previewed and chosen your template, it’s time to get to the fun stuff: editing!
You’ll automatically be redirected to the Wix drag-and-drop editor. If you’ve never heard of drag and drop before, it’s the feature that makes Wix so easy to use. All you need to do is select the component you want from the left-hand toolbar, drag it where you want it to go and drop it!
Many website builders can be quite restrictive with where they allow you to move elements, but Wix isn’t like that. You can put anything anywhere, meaning you have a ton of creative freedom!
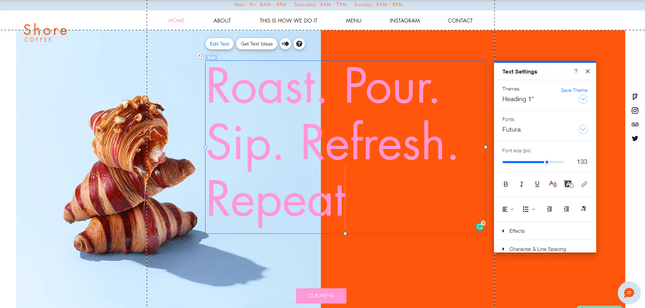
When you begin editing your site, the first thing you’ll want to do is update your company, portfolio, or blog details. To do this, simply click on the text you want to change, then rewrite – it’s that easy. You can also change the font size and color, and typeface favorites like italics and bold are there for some extra font-based fun.
Adding and Editing Images
Most templates come with images, and these can be changed too. This is what makes Wix the best – you get to personalize every part of your website, one click at a time.
If you don’t like an image, or just want to swap it out for one of your own, click it and select ‘Change Image’. A popup will then appear, where you can upload your own images, edit them, and add descriptions.
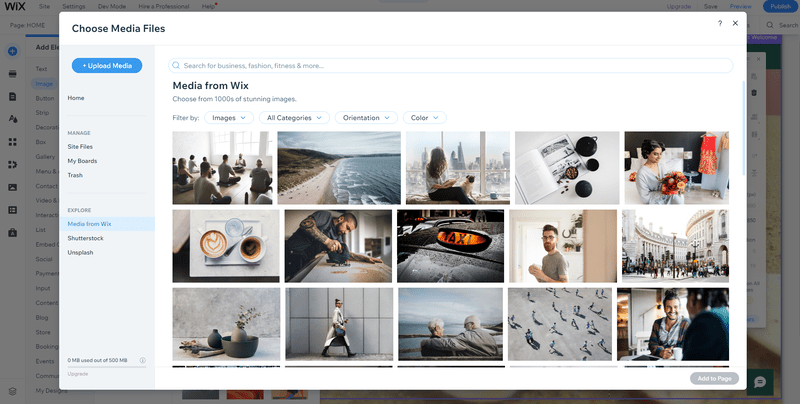
Wix also comes with a ton of free images, so if you don’t have any of your own to hand, you can browse the photo library and select those that fit your brand and website.
Once you’ve uploaded and added the image you want, you can drag the corners to resize it, or click and drag to move it to a new location entirely.
If you’re looking for some more in-depth assistance, check out this video on building with Wix:
Personalize the Background
Adding Images to Your Background
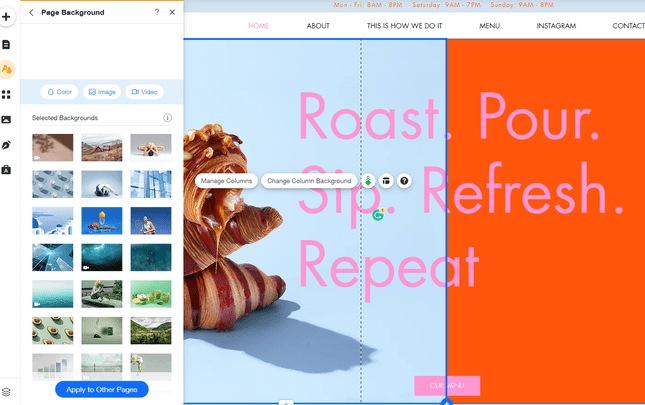
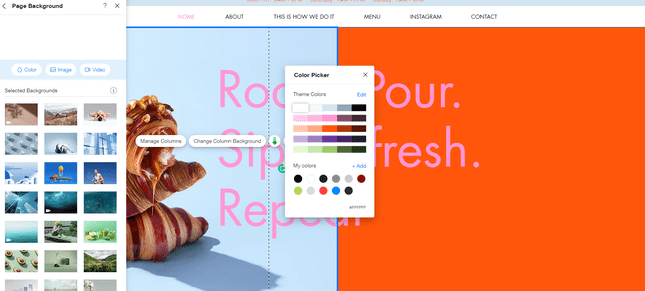
When small images aren’t enough, you can also change your template background. The left-hand sidebar features an icon called ‘Site Design’. It looks like a capital ‘A’ with a color drop in front of it.
When you click on this, a panel will open giving you the option of changing your color scheme, your page background, or your page transitions. To add background images, you’ll need to click on the ‘Page Background’ box.
To add an image, you can choose one of Wix’s free photos, or click the ‘Image’ button at the top of the tab. The same image upload pop-up will appear as before, so you can select the image you’d like to add. You can also do the same with a video if you’d rather have something more dynamic in the background!
Changing the Color of Your Background
If you like the idea of fancy backgrounds, but you’d rather just keep things simple, you can choose to set your background to a flat color. Once again, you’ll need to follow the steps we’ve outlined above but select the third button (labeled ‘Color’).
This will open a color picker, which allows you to choose the perfect shades to suit your brand. You can choose one of the theme colors, or find your own using either the custom color option or the specific color code.
Adding Pages
Once you’ve created a stunning homepage, there are a few other pages you should add to ensure your website has everything visitors are looking for – an “About” page and a “Contact Us” page, for example.
To add a page to your site whilst in the Wix Editor, click the down arrow next to your current page at the top of the editor, then click “Manage Pages.”
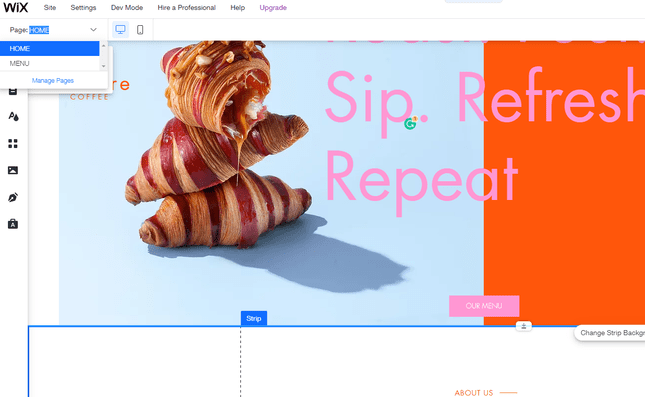
From the resulting menu, you’ll be able to add pages and customize them to serve different purposes.
If you want to dig even deeper into the makeup of your pages, click the three dots next to your page title. This will open a sub-menu where you can tweak your SEO settings and rename, duplicate, copy, or even hide a page.
Further Information
Want a helping hand designing your pages? We think these guides could help!
How to Add Apps
Out of all the website builders that we’ve researched and tested, Wix has by far the best website tools on offer. It really does have something for everyone, whether you’re opening an online store, starting a personal blog, or launching a portfolio to showcase your artwork. With this in mind, we awarded Wix a score of 5 out of 5 for website features, putting it firmly in first place in this category.
Plenty of these tools and features come built into Wix’s editor, but one of the biggest reasons Wix steals the crown here is its ever-expanding app library. To date, Wix’s App Market has over 800 amazing applications to boost your site.
They cover everything from restaurant orders to interactive quizzes. In short, this means that when it comes to what exactly your Wix website can do, the possibilities are endless. The apps don’t just look great, either – they also provide your website with the modern interface necessary to stay competitive.
To add apps, head to the left-hand toolbar once again, and click on the icon that looks like a grid – this will open the app market.
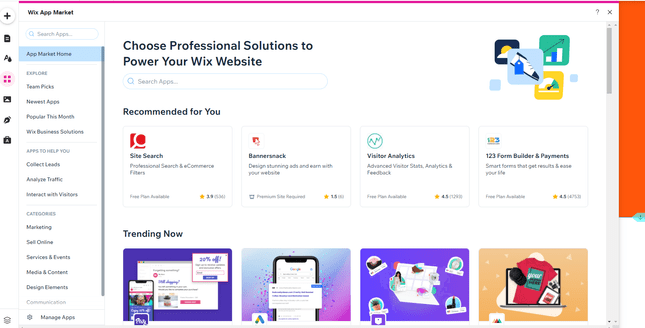
There are a couple of ways to browse the app market. You can either use the search bar or browse Wix’s trending favorites and featured picks. Each app has a thumbnail preview, with a ‘Free’ or ‘Premium’ price option (or both). And best of all, unlike most markets, you won’t need to haggle for prices.
It is worth noting, though, that some of Wix’s apps can get a bit pricey – particularly if you choose some of the premium options. This means that your monthly costs can rack up pretty quickly if you’re not careful!
We recommend planning out all the apps you’d like to use before downloading them. This way, you can keep an eye on your costs!
Further Information
Read our review of the Wix App Marketplace
Set Up a Blog
Adding a Blog
This isn’t a necessity, but lots of businesses like to add a professional-looking blog page to their website to keep their audience in the loop with what’s going on. Luckily, Wix is one of the best website builders for blogging!
To add a blog, click on the pen-shaped icon in the left-hand toolbar. A tab will appear, inviting you to add a blog to your website. You’ll be given three different options: a personal blog, a blog with a writing team, or a blog with a members’ area. Choose the one best suited to your brand.
Of course, there are a wealth of blogging apps available on the app market, but we recommend Wix Blog for its ease of use and sleek appearance.
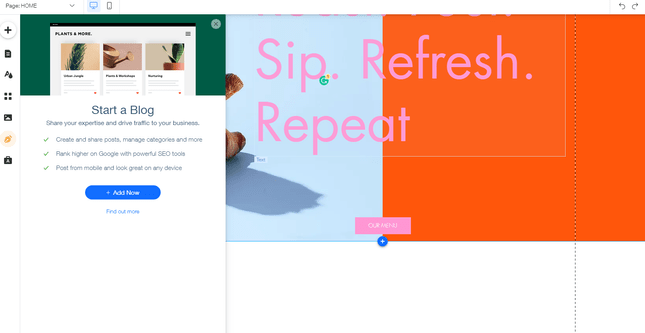
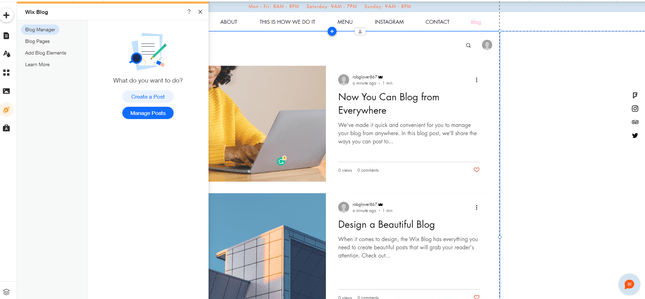
Of course, there are a wealth of blogging apps available on the app market, but we recommend Wix Blog for its ease of use and sleek appearance.
Adding and Managing Blog Posts
When you’re ready to create your first blog post, click on the blog icon in the toolbar, and select ‘Create a Post’. A window will open that looks a bit like a Word document, and this is where you can start writing.
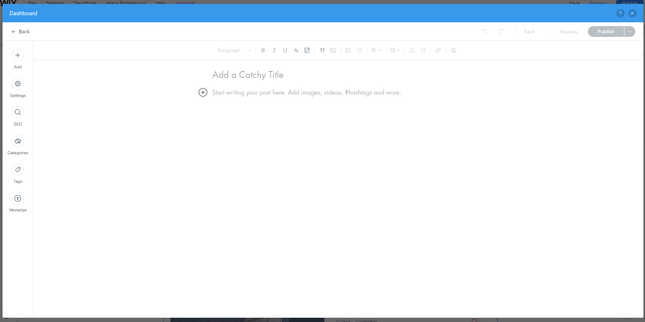
Wix Editor isn’t the only place you can write blog posts, either. You can also create them in your dashboard. Click on the ‘Blog’ header in the dashboard’s side toolbar, and then select ‘Create New Post’ in the top right corner.
Add Extra Blog Features
Wix’s blog app itself is easily manageable. Not only can you write awesome posts but you can add some useful extras, too. In the editor, click the same pen-shaped button as before, then select ‘Add Blog Elements’. From here, you can throw in some handy features, such as an Instagram feed, events, or an RSS (Really Simple Syndication) button used for sharing content online.
Further Information
See our Beginner’s Guide to Starting a Blog
Add an Online Store
If you’d like your site to function as an online store, then you’ve made a good choice using Wix. In fact, we’ve rated it as our overall top ecommerce website builder, as well as the best website builder for small businesses.
Adding an online store to your site is simple. By clicking the “+” icon in the left-hand menu, you’ll be presented with a list of add-ons for your site. From this list, click “Store,” and you’ll see the option to “Add a Store.”
Once you’ve completed this step, the next time you navigate to the ‘Store’ option, you’ll be able to add different ecommerce features such as different product galleries, add-to-cart buttons, and a currency converter.
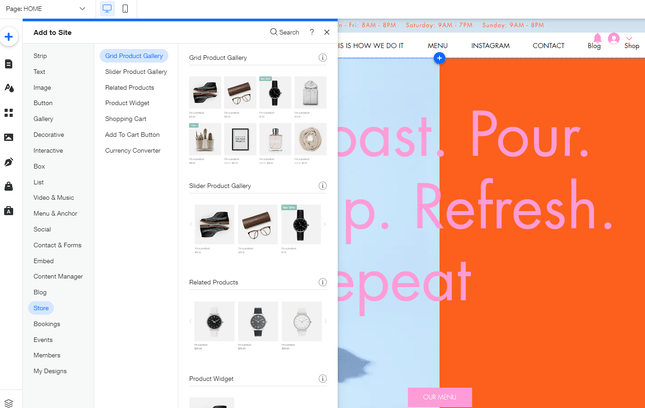
Ecommerce Apps
You’re not just limited to the features in the store menu – Wix has a ton of ecommerce apps in its app market. From dropshipping to payment gateways and tax support, there are plenty of tools to increase the selling potential of your website.
Choosing an Ecommerce Pricing Plan
Although you can set up an online store in the blink of an eye, you’ll need to choose one of Wix’s three ecommerce plans before you can start selling. Unfortunately, you won’t be able to sell on its free plan.
Further Information
Read our Wix Ecommerce Review for more detail
For tips and tricks, check out our guide to selling online
Optimize for Search Engines
Accessing your Website’s SEO Settings
Wix Editor makes it straightforward to work with your site’s SEO (Search Engine Optimization) capabilities. On the left side of the site editor, you can click “Menus and Pages,” then click on the ellipses next to any page to be presented with this list of options:
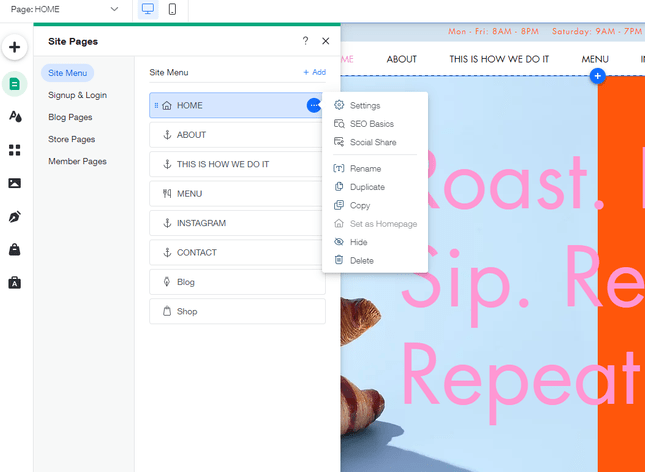
Then, click “SEO Basics.” This will open another menu, where you’ll be able to see all of your site’s basic SEO functions. You’ll have the option to view your URLs, as well as edit the site description that will show up in the SERPs (Search Engine Results Pages).
Using Wix’s SEO Wiz
There will also be a button inviting you to ‘Go to SEO Wiz’. This is an awesome tool for SEO newbies and helps you to cut through the jargon and optimize your website with ease.
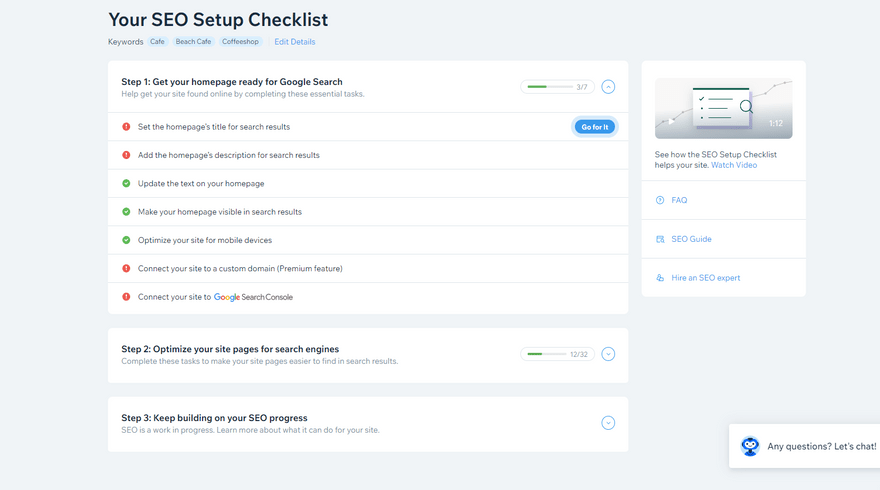
It’ll prompt you with a short questionnaire, and once you’ve filled in all of your answers, it’ll create a handy SEO checklist to make sure you’ve ticked off all the most important things.
Making Your Site Mobile Friendly
Making sure the mobile version of your site looks great is vital to its success, since mobile is pretty much taking over the world – these days, 61% of people search only on a smartphone.
Thankfully, with Wix Editor, mobile optimization is as easy as it is important. To start, hover your mouse over the desktop screen at the top of the editor.
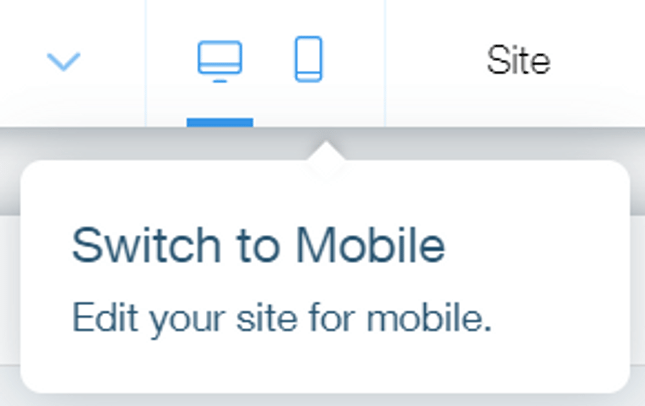
Then, click the mobile icon to see what your site will look like when viewed from a phone screen.
Odds are, Wix has taken care of mobile view for you, and your site already looks awesome in this format. But you can still make as many changes as you want, and any edits you make in mobile view will not affect the desktop version of your site.
Choose a Domain Name
Before you publish your Wix site, you’ll need to set your domain name (Wix will prompt you to do this when you click “Publish”).
If you’re using Wix’s free plan, then you won’t be able to use a regular domain name like “www.mysite.com” or “www.mysite.net” (domains like this only come with Wix’s paid plans). Instead, your site will follow the format www.yourname.wixsite/yoursite, which is enough to get it up and running. But if you’re going for a more professional look, then we recommend upgrading to a paid plan to secure a more polished domain!
Further Information
Has the mention of domain names sent you into a panic? Don’t worry – we’ve got a ton of guides to help you out!
Publish Your Site
By now, your Wix Editor site will be ready to go. Throughout the Wix editing process, you can preview your masterpiece with the button in the top right corner. Once you’re satisfied, simply click “Publish” next to “Preview,” and… it’s live!
You can always edit your Wix site after publishing, so don’t feel like this is a permanent commitment to the changes you’ve made. Just open the dashboard, click “Manage Site,” then “Edit Site,” and off you go. To re-publish, just click “Publish” again in the top right corner.
Just remember – you won’t be able to change your base template once you’ve published, so make sure you’re happy with that choice before you commit!
How to Use Wix ADI
Getting Started
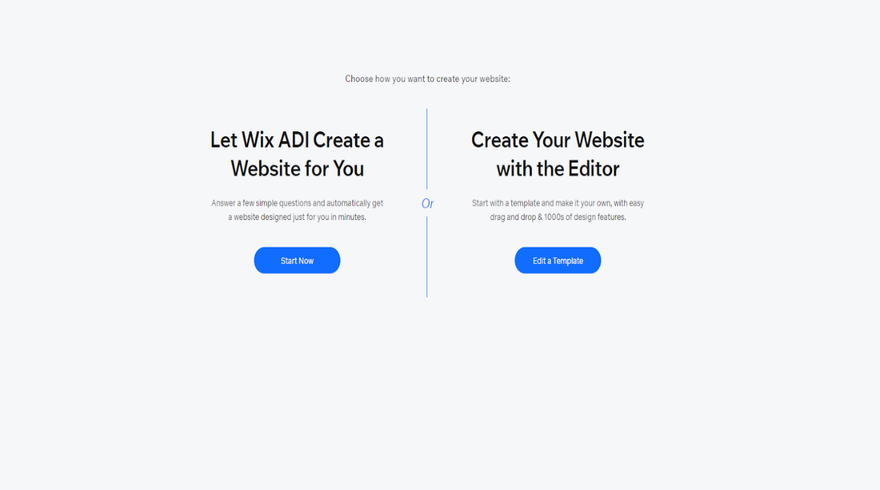
If you don’t have the time or the technical confidence to dive straight into Wix Editor, Wix ADI (Artificial Design Intelligence) has made it easier than ever to design a website. You’ll be asked a few questions and then given a stunning website, just like that. As if Wix couldn’t get any easier, right?
After you’ve registered your account, click the “+ Create New Site” button and then “Start with Wix ADI.”
Adding Features
You’ll then be asked which features you might need. Tick the relevant boxes, and then click “Next” on the bottom right-hand side. Don’t worry if you change your mind, or even your business model – you can edit Wix ADI at any time.

Inputting Your Contact Details
Wix ADI will ask you for the contact details you’d like to include on your site. Try to provide as much information as possible, as this allows the ADI to create detailed navigation menus, footers, headers, and contact pages with ease.
And remember – the more accurate your answers, the better Wix ADI can customize the perfect site for you.

Designing Your Site
Yes, the design is up to the ADI, but you can still have some input if you want it. The ADI can produce billions of text combinations and images, so you’re guaranteed a website that’s sleek and unique.

Now that the ADI knows what you need, it will take you through the design process. Once you click “Start,” you’ll be presented with some color schemes. Take your pick, but don’t stress too much – you can change these later on if you like.
When you’ve picked the color scheme that appeals to you most, Wix will show you a choice of three homepage designs. If you hover over each one, you can scroll down to see the entirety of the design. Pick the one you like best!
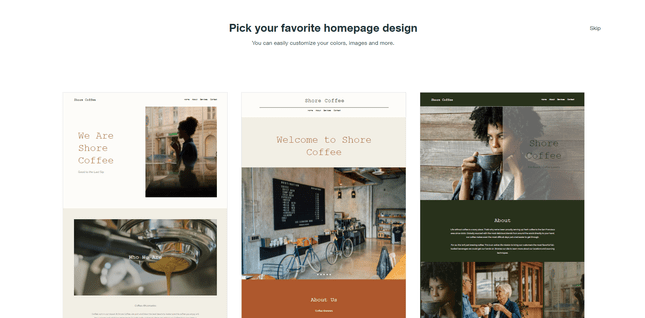
After this, you can choose from a number of extra pages to add to your website, such as an “About Us” page or a contact form. If you’re not sure what pages you’re going to need right now, you can also add a blank page that can be edited later on.
Confounded by color schemes? We can help with that! Check out our guide on How to choose a color scheme for your website
Editing Your Design
When you’re happy with the overall appearance, click the blue “Edit Site” button in the top right corner. This allows you to personalize your website further by changing fonts, adding media, and introducing a whole host of other functions with the help of Wix ADI’s smart assistant. It’s fast and gives you a small amount of creative control. It’s like handing an artist the paints you’d like them to brush with.
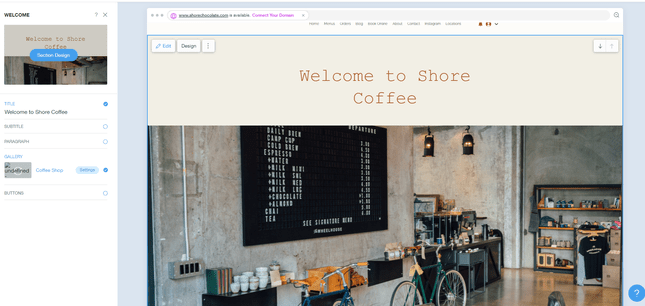
However, the smart ADI assistant is far more restrictive than Wix Editor. So, if you’ve been inspired to really put your stamp on your site – or if you’re simply not happy – you can easily switch to Wix Editor mode whenever you like. Think about it, though, because it’s harder to reverse the process – you’d need to save your last ADI version, then restore it.
Optimizing for SEO and Mobile
If you thought SEO and mobile functions were easy to implement with Wix Editor, then we have good news: it only gets easier with Wix ADI.
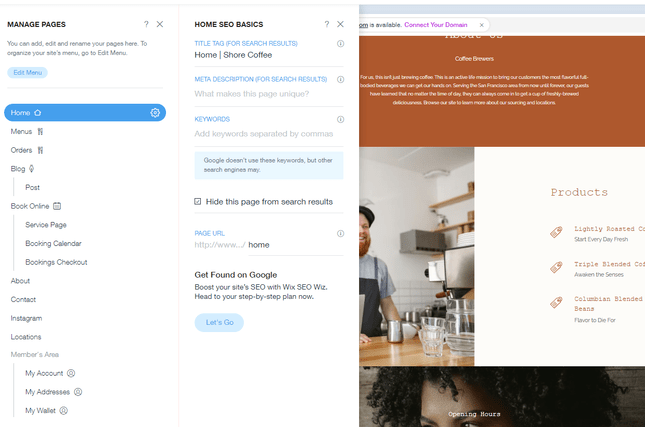
To edit the SEO functions of any page on your site, click on the page in the left-hand toolbar and choose “SEO Basics.”

Like the Wix Editor, this will then open another menu where you can edit your meta description and title tag, and add keywords for specific pages.
Read our Wix SEO Review for more information
Optimizing your Wix ADI site for mobile requires even less effort than SEO. When you click on the desktop icon on the top menu of your site page, you’ll be able to switch to a cell phone icon.
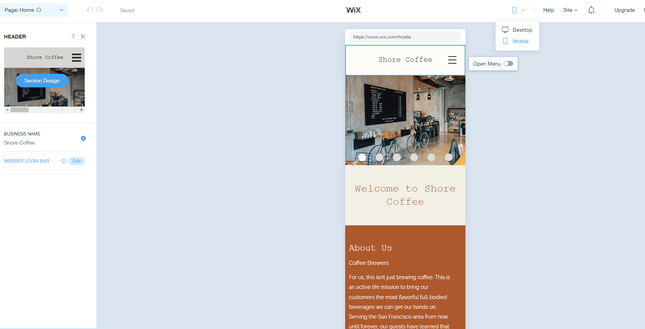
Clicking this will take you to the mobile view of your site, which you won’t have to make any changes to (unless you want to). Wix ADI has already prepared your site to look sleek for viewers on the go!
Choosing a Domain
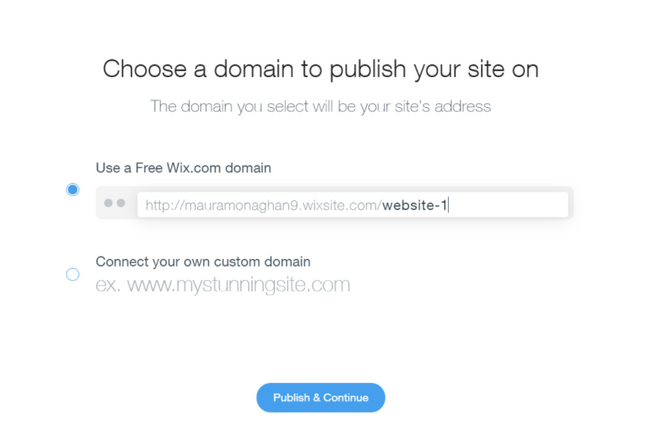
When you’re done creating your site, you can click “Publish” in the upper right-hand corner of the screen, and you’ll get this page:
Publishing Your Website
Your final product is now ready to publish. Click ‘Preview’ at the top of the ADI screen to have one last check, then simply press the X icon to return to the editing page. Now, hit ‘Publish’ at the top.
Doubting the design? You can make edits after publishing on Wix ADI at any time. Just go into your dashboard after signing in, click “My Sites,” then “Edit” on your ADI website. Should you want to, you can always unpublish your Wix site at any stage, too.
Upgrading to a paid plan is the only way to secure a domain in the regular format of “www.mysite.com.” If you’re using Wix’s free plan, you’ll have to use a domain with the format www.yourname.wixsite/yoursite.
We spoke with Stephanie, owner of Speak with Stephanie, about her experience building with Wix:
Wix in Action: Speak with Stephanie
Q&A
When did you start using Wix?
My knowledge of coding is minimal so I looked into website platforms where that expertise wasn’t needed. I was told by several colleagues to use Squarespace, Weebly, and Wix, in that order. Every professional and website user is unique and needs and preferences are different for this reason. Because of this, and simply not wanting to “follow the crowd”, I made a free account with each of the aforementioned website platforms. Although cost was a factor, my main goal was to have a visually appealing and professional website that was easy to create.
What do you like most about Wix?
What would you change about Wix?
Were you satisfied with the website you made, and would you recommend Wix to others?
Click the + to see our favorite part of Stephanie's website

The navigation bar on the Speak with Stephanie website is incredibly clear, and we love that the services tab expands to direct visitors to what they’re looking for.

Get to Know the Wix Dashboard
You’ll be using the Wix dashboard pretty much from the get-go, whether your site was built with Wix Editor or ADI. Once your site is live, the Wix dashboard will be where you can make any updates or changes to your account – so it’s best to get comfortable with this page as soon as you can!
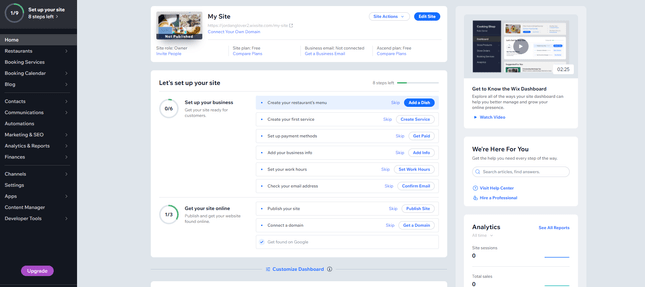
There are three main areas that it’s important to get your head around. The first is the toolbar on the left-hand side. This is the analytical hub, where you can control potential site functions like an online store (“Financial Tools”), marketing and publicity (“Marketing Tools”), and a blog (you guessed it, “Blog”).
The second section 2 is the top banner, where you can see the heading “My Site.” This is your gateway back to the site editor, where you can make more creative changes. By clicking on the “Site Actions” menu, you’ll be given a list of options including the following:
- Rename Site
- Get Feedback
- Preview Site
- Transfer Site
- Invite People
- Duplicate Site
- Move to Trash
- Create New Site
From this section, you can also upgrade your Wix plan and edit your domain name.
The third section is underneath this, with a heading that says “Let’s set up your site.” It’s a scrolling to-do list that you can work your way through in order to create the most effective site possible. When it comes to add-ons and ideas, Wix has thought of everything for you, so you can take your time picking and choosing which options you’d like to implement.
How to Make a Wix Website: Summary
Wow, that sure was a lot! We promise it’s easy as pie though! Wix has one of the best ease-of-use scores across all the website builders we test, with a score of 4.4 out of 5.
The only thing now is to try if yourself! That’s all from us, and have a wonderful Wix experience!


32 comments